A Vegan Lunchcast Tutorial - How to Make Seitan
 Well, I promised that I would document the process with pictures if I made some seitan this weekend, so here it is. I was originally planning on doing chicken-style, but I need some for fajitas so I will be doing beef-style instead. It's the same process though, and you'll get the picture. I actually ended up using a hybrid recipe which contains my favorite parts from two different seitan recipes. This first pic is a shot of all the raw ingredients that you will need to gather. This is the only one of the set that is interactive. Moving your cursor over each item will identify it in a pop-up text box. The actual recipe that we will be using looks like this:
SEITAN (Dry ingredients)
2 cups of Vital Wheat Gluten
2 Tbsp of All-Purpose Flour
1/4 cup of Nutritional Yeast
SEITAN (Wet Ingredients)
1 1/2 cups of Cold Water
1/2 cup of Bragg's Aminos, Tamari or Soy Sauce
1 Tbsp Ketchup
1 Tbsp Canola Oil (or Olive Oil)
2 cloves of Chopped Garlic
1 tsp of Lemon Zest
COOKING BROTH
12 cups of Cold Water
1/2 cup of Bragg's Aminos, Tamari or Soy Sauce First combine the three ingredients that make up the dry part of the recipe. Here, as you can see, I have put them into the mixing bowl of my KitchenAid Mixer. If you have one of those, it will really make the process of making seitan easier for you. After you have the dry ingredients together in the bowl, then it's time to mix up the wet ingredients in a separate bowl. It's important to do this in a different bowl and then add the wet stuff all at once because if you just started adding wet things to this one by one, it would gel up on you and everything wouldn't get mixed well and you would end up with a big mess.
 So, in a different bowl, combine all of the wet ingredients and mix them together really well with a whisk. If you are missing some items, it's easy to do substitutions. In fact, the original recipes call for tomato paste, but I hate opening a can just to get a tablespoon out, so I always use ketchup instead. It works just as well. Now that you've got all your wet ingredients stirred together really good, it's time to bring them together with the dry ones, but first...
 Make sure that you use a dry wisk, or a fork, and mix the dry ingredients up real good before the wet liquid hits them. This will help make sure that everything gets distributed really well throughout the entire loaf of seitan. If you just dropped liquid in on top of this without stirring it really good, the gluten would set up and leave all that flour and nutritional yeast sitting out there unincorporated. This is a picture of all the dry ingredients, mixed really well, waiting in the mixing bowl for the wet ingredients.
 And this is what it looks like immediately after you pour all of the wet ingredients in on top of the dry ones. If you're using a mixer, then right after you do this, get the mixing blade into the bowl and get that stuff mixing. If you're using a spoon, or whatever, and doing it by hand, start mixing it immediately. On a KitchenAid mixer, I just use the lowest setting along with the flat paddle mixer. I tried making it once using the dough hook attachment, but that just really didn't work well for me.
 Here's a shot of what it looks like as it mixes. You'll want to let it mix a good 5 minutes or so. I don't know if it's possible to overmix it. I doubt it. There's also a little bit of art to this right here at this point. As mine was mixing I thought it looked just a little bit too wet, so I tossed in 3-4 more Tbsp. of all-purpose flour just to help it come together into a solid mass a little bit more. While this is mixing you can get your cooking broth together in a big pot and bring it to a boil on the stove.
 When the seitan is all finished mixing, and you remove the bowl from the machine, you should have something that looks like this. I know it's not pretty, but trust me, this will look like pieces of steak in the end. In fact, it's even gonna' get a little creepier looking as it cooks because it basically ends up looking a little bit like a brain, but oh well. It ends up pretty in your final dish, and that's what matters.
 Plop the big, sticky, rubbery glob of gluten out onto a cutting board and shape it into a loaf shape using your hands. Stretch it out pretty good because you are going to be cutting it into about six smaller pieces. Once you have it in a nice loaf shape, just let it sit and rest while you continue to wait for your cooking broth to come to a boil. When it does start boiling, then turn the heat down to low where it will just simmer from this point on. It's very important that it does not boil while the seitan is in the broth.
 The broth can cool down and stop boiling while you cut your big piece of seitan into six smaller pieces. I like to use a serrated steak knife because it seems to cut through the rubbery stuff a little better. I'm cutting mine here into big chunks because I am later going to slice them into small strips, like you would find in a fajita. If I were making chicken-style seitan, like for the buffalo wings, I would probably use kitchen shears and cut this big loaf into small chicken-like pieces and let them drop directly into the cooking broth.
 Here I am using a spoon to carefully place the six pieces of seitan into the cooking broth. Be careful here and don't let the broth splash on you. If it is still boiling and you can see bubbles in it, just wait a few minutes until that stops before you add the seitan. Remember, DO NOT let it boil with the seitan in there. If it does, then the water in your rubbery seitan will vaporize into steam creating large holes in the seitan and you will end up with a really poofy spongy mess. The seitan is going to end up being spongy enough on its own without any help from us adding large holes to it. Once your broth is ready, and you get the seitan in it, then just put a lid on it and go watch television or something for an hour while it simmers.
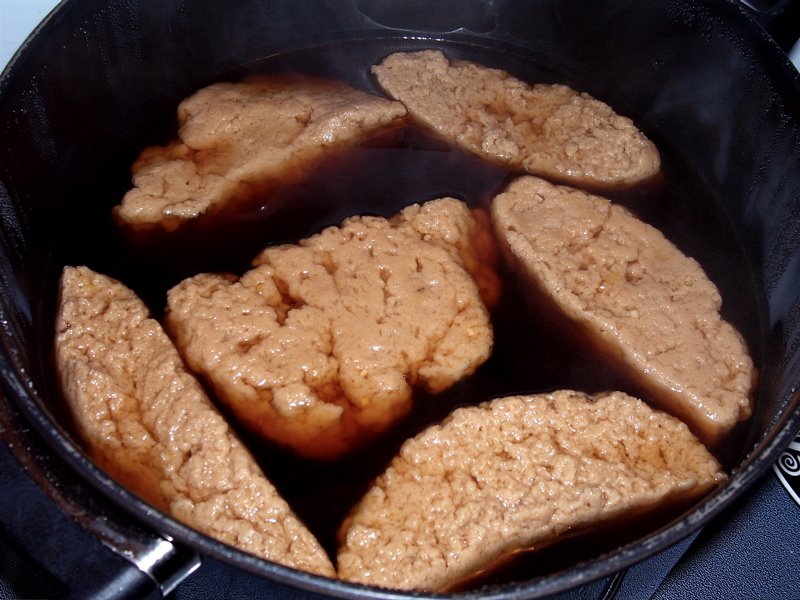 After an hour or so of simmering, the seitan will signal that it is done by floating to the top like this. Remember, I warned you this wasn't going to be pretty. It kinda' looks like brains doesn't it? Normally, at this point, I remove the pot from the stove and put it somewhere out of the way to cool. I usually even dump a couple of cups of ice cubes in just to help it cool down completely. It is VERY IMPORTANT that you let it cool down completely if you want your seitan to be as firm and as meat-like as possible.
 Here is a picture of one of the chunks sliced in half after it has cooled off. You can use the chunks immediately or store them in a container of their broth in the fridge for about 5 days. If you want, you can even plop the big chunks into a ziplock bag and throw them in the freezer for use later. I plan on using mine right now to make fajitas, so I am slicing each chunk in half like this, and then cutting it into slices, which I can then cut in half giving me nice steak-like slices that look like this...
 TAH-DAH! This is the finished product, beef-style seitan. This stuff is great for making fajitas like the ones I brought the other day in my lunchbox. I can also see cutting this up into small cubes and using it to make chimichangas or something like that. You can also just drop the big chunks into a food processor and grind them right up and use them as a substitute for ground beef in just about any recipe like tacos or spaghetti sauce. Some people even like to cut the big pieces into very large slices and then dip them in flour, soy milk and bread crumbs and then fry them in a skillet and cover then with gravy, etc. I haven't tried that yet, but I plan to.
So there you go. This is what it looks like when I make seitan. It's really not hard. I think that the biggest danger is making sure that the broth does not boil while the seitan is in it. Other than that, there's not too much that can go wrong. I hope this is helpful showing you what this stuff looks like in all the intermediate stages because, as you can see, it is not pretty at all. The first time I made it, about halfway through, I was wondering if I should just throw it all in the trash or what. But as you can see from the pics, if you just stick with it and follow through to the end, you CAN make your own homemade meat replacement that is a whole lot cheaper, and a whole lot tastier than anything you can buy at the store. Now go make some seitan. GOOD LUCK!


32 comments:
This step-by-step guide kicks butt! Thanks for going through it like this-- my husband and I have talked about making seitan several times and not gotten around to it-- this might just be the kickstart we need :)
Stephanie
Yay for Kenny! Nice tutorial!
WOW! That is a LOT easier than I thought. . . the recipe I have doesn't use gluten, it uses flour that you wash to get to the gluten, and the thought of all that washing has kept me from wanting to attempt to make seitan at home. . . but this recipe looks fabulous! I am so inspired now. . . thank you!
--K
I'm going to attempt this next weekend. What ingredients are different if you want a chicken style product instead of beef?
wow awesome thanks so much Ive never seen it on sale over here even it ethnic and health stores so i HAVE to try this!! :D
THANK YOU! that's so great.
I kept saying (while reading this) Ohhhhhhhhh. so that's where I went wrong.
Mine was OKAY, but this looks so much better. :) Thanks again!
this seitan looks so much better than my first attempt! I'll definitely try your method when I finally get my new stove (hopefully this week!)
Thanks so much for posting this. I tried making seitan a few weeks ago and it turned out really sponge-like. Now I know why!
Thanks very much for the tutorial. Can't wait to try it.
is this from the PPK?
i'm giong to make 'beaf' stroganoff with rice when i make that.
i wanna kitchenaide!!!
just switched over to vegetarian. i truly appreciate sites like yours.
makes the transition a lot easier. :)
s
i stumbled across your blog while looking for new vegan recipes, and i am smitten. consider yourself bookmarked...
Kenny,
You cracked me up with your "looks like a brain when cooked" comment.
Thank you so much for the tutorial, it came out perfectly!
THANK YOU!! This is an awesome tutorial and really puts to rest the fears I had about making seitan. My only question is the same as Liz's, what do I change to make chicken seitan instead of beef seitan?
Thanks again Kenny!! This is really helpful. Also any comments on the different recipes (like ones that call for flour instead of the gluten)?
Thanks for doing this! I made seitan a few weeks ago and it was very sponge-like. Now I know why!
Thanks, it seems a little less frightening now. Do you cover the seitan while it simmers?
thanks so much for the tutorial! i had visions that it was a lot more work to make. I think your blog is awesome, I check it out everyday
i kept saying the same thing that someone else said..."oh, okay, that's what i was doing wrong!" mine was always real poofy and it always floated to the top immediately. now i see how to do it right! thank you so much!
Wow! This is soooo much easier than I thought. And, imagine, I used to pay $8.00 for a pound for seitan that was full of preservatives. I made this following the recipe and can't believe how easy this was and tasted just fantastic. It is time consuming, but worth the savings.
"My only question is the same as Liz's, what do I change to make chicken seitan instead of beef seitan?"
Instead of ketchup and lemon zest, use lots of vegetarian chicken broth powder (available in many health food stores) and/or poultry seasoning (or sage, thyme, rosemary)
i did everything a lil bit extra i washed the prep seitan under cold water and then i lowered the stove to a medium flame and put the seitan in it an covered the lid after half an hr i saw mine was a spongy mess:( can u pls tell me why i would love it make it again just like yours thanks
Thank you so much for this great tutorial! Your seitan looks perfect. Once I found gluten I'll definately try this recipe.
I found your blog looking for how to make my own seitan and yours is the best and clearest so far! However a question please...to make just plain to add other things to do I just use the dry with water? and how would I do it by hand?
Also I love your blog in general!
You're right, it does look like brains. Its cooling right now and then, for the first time, I will be trying it. Frying it up. I didn't quite get the firmness yours did, but I will try again. Thanks for the tutorial! Bravo
Wow, thanks for this!
Great tutorial, found it while googling how to make seitan.
Consider me a new regular reader!
Wow! Thank you so much! I work in a cafeteria and I'm responsible for the vegan/vegetarian entrees, but I have a very tight budget. I've been searching for a decent homeade seitan recipe that I could use in the stead of the expensive meat analogs out there. You've done such a great job of explaining the process I'm not even nervous about trying to make it!
This is a great tutorial! Thank you so much for posting it! I've tried making this a couple of times from a different recipe which called for baking it instead of simmering, and I was never happy with the texture. I can't wait to try this method instead.
This recipe comes out perfect everytime. Have tried others, but I don't know what it is about yours perfection everytime. I think it may be the ketchup or tomato paste. When I have neither I will use homemade tomato soup in mine. And when I delete that ingredient, the seitan doesn't come out as well.
I know you haven't blogged in a while, but thank you thank you thank you for this recipe and accompanying pictures! For a month now, it's been my dream to make some delicious veggie protein from scratch...to celebrate my birthday at that. Today's the day, and this seitan is better than the ice cream after the cake! Thank you so much!!
Oh my gosh this is awesome! Thank you so much for posting this. I've been a little wary about all the tofu/soy is-it-good-or-bad thing and I've been wanting to make my own fake meat for a long time. This looks so easy and tasty! I can't wait to try it! Thank you!
I found a site that had similar ingredients and I have made the seitan several times using a variety of flavorings (thyme, sage, rosemary, red pepper flakes) and they all worked well. Just depends on what you like.
The big ddifference was that when you get to the "log" stage instead dof boiling the log is wrapped in aluminum foil and cooked for an hour to and hour and fifteen minutes in a 325 degree oven.
I liked baking it in the oven. It seemed easier and produced a nice "log" ratheer than lumps of "brain".
This post gave a lot of answers but also a lot of questions, since my seitan dough looks nothing like that. It right away gets together to a very tough/rubbery consistance, while tours looks like a wet dough that is able to form (mine is not!). But I will try to make it once again. Can I use a mixer without that paddle? And if I can, do I use the knife-thing or the thing that looks like the knife-thing but is in plastic and non sharp? So many questions :)
Post a Comment